Friday, October 4, 2024

Zigzag Christmas Tree Ornament


Materials: 

x2 size 5 double pointed needles
5 yards worsted weight yarn, I recommend using red, green, or white colors (I used Soft Classic by Loops and Threads in Bright Red)
Small amount of crochet thread or fingering weight yarn in a similar color to your worsted weight yarn
x11 8mm beads
Tapestry needle
Scissors

Main Pattern: 
We will be making a long i-cord, so I would Google video instructions if my written instructions don't make sense to you! 

Cast on 2 stitches. 
  1. Knit across the first row.
  2. Slide all the stitches to the other end of the needle and turn the needle around so that the wrong side faces you. 
  3. Knit across this next row. The yarn will come from the wrong side of the needle, but that's what we want. 
  4. Slide all stitches back to the first side of the needle and turn in around so that the other side faces you.
  5. Same as row 3.
Continue with knitting rows 3 and 4 over and over again in this fashion until the cord measures 21 inches.

Finishing: 
  1. Slide the stitches to the other end of the needle one more time.
  2. Cut the yarn, leaving a long tail of 6 inches or so. 
  3. Using a tapestry needle, thread the end through the wrong side of all 3 stitches (the yarn will come from the wrong side of the needle still). Slip all stitches off the needle and pull yarn tight. 
  4. Weave in the end of the yarn using the tapestry needle and cut off excess.

Assembly

Weave in the end of the yarn using the tapestry needle and cut off excess.
Fold the knitted i-cord starting with the bottom being 3 inches wide.
Continue to fold each branch, with each one being narrower than the one below until you run out of chord. 
Place a bead in between each branch.


Thread your needle with crochet thread or fingering weight yarn.
Thread one strand of yarn through the bottom bead all the way and fold in half, so that the yarn is folded in half with the bead at the bottom of the loop.
Thread both sides of the yarn through the next bead and then through the middle of the i-cord.


Continue threading the yarn through each bead and then through the middle of the next branch until you have reached the top.


Thread the last bead at top and tie a knot above the top bead.


Make a hanger by making another knot about 2 inches above to top bead and then stringing another bead and tying a last knot (so that that bead is trapped between two knots). 


And you're done! Congrats! 

Sunday, January 8, 2023

Ombre Cup Cozy

 Ombre Cup Cozy

Size: 
4 inches long (fits Starbucks-type cup)

Materials: 

x4 size 4 double pointed needles
20 yards color #1 DK weight yarn (I used Knit Picks Swish DK in Arctic)
20 yards color #2 DK weight yarn (I used Knit Picks Swish DK in Serene) 
20 yards color #3 DK weight yarn (I used Knit Picks Swish DK in Bluebird)

Abbreviations:
K – knit
P – purl
K2tog – knit 2 stitches together

Main Pattern: 
With color #1 yarn, cast on 52 stitches.
K2P2 for 5 rounds.
Continue knitting in color #1 until the piece measures 1.25 inches.

Switch to color #2 yarn and knit for 1.25 inches (total of 2.5 inches for the whole piece).

Switch to color #3 yarn and knit for 0.75 inches (total of 3.25 inches for the whole piece).

Decreases: 
Round 1: K2tog, K11 around.
Round 2: Knit.
Round 3: K2tog, K10 around.

Finishing: 
K2P2 for 5 rounds.
Bind off loosely and weave in ends.

Friday, January 29, 2021

Candy Corn Cup Cozy

Candy Corn Cup Cozy


Size: 
4 inches long (fits Starbucks-type cup)

Materials: 
x4 size 4 double pointed needles
20 yards white DK weight yarn (I used Knit Picks Swish DK in White)
20 yards orange DK weight yarn (I used Knit Picks Swish DK in Clementine) 
20 yards yellow DK weight yarn (I used Knit Picks Swish DK in Honey)

Abbreviations:
K – knit
P – purl
K2tog – knit 2 stitches together

Main Pattern: 
With the white yarn, cast on 52 stitches.
K2P2 for 5 rounds.
Continue knitting in the white yarn until the piece measures 1 inch.

Switch to the orange yarn and knit for 1.5 inches (total of 2.5 inches for the whole piece).

Switch to the yellow yarn and knit for 0.5 inches (total of 3 inches for the whole piece).

Decreases: 
Round 1: K2tog, K11 around.
Round 2: Knit.
Round 3: K2tog, K10 around.

Finishing: 
K2P2 for 5 rounds.
Bind off loosely and weave in ends.

Wednesday, December 25, 2019

Heart Earflap Hat

My first pattern is a heart earflap hat, for those of you who want love on you at all times!

Heart Earflap Hat


Size:
Adult Medium/Large

Materials:
1 skein of Loops & Threads Cozy Wool in black
1 skein of Loops & Threads Cozy Wool in claret for trim and hearts
US size 11 circular needles
Five US size 11 double pointed needles
US size K crochet hook

Abbreviations:
M1 – increase 1 stitch
K – knit
P – purl
K2tog – knit 2 stitches together
P2tog – purl 2 stitches together
Sts – stitches
* – indicates to repeat the following stitches (i.e. *K2tog, K1 to end)

First you will make the two earflaps separately. Then you will attach them and knit the body of the hat. Next, you will decrease for the top of the hat. Finally, you will fasten off and add ties and tassels.

Earflaps:
Cast on 7 stitches
Row 1: Knit

Row 2: M1, purl till last st, M1 (9 sts)
Row 3: Knit
Row 4: M1, purl till last st, M1 (11 sts)
Row 6: M1, purl till last st, M1 (13 sts)
Row 5: Knit

Work the 13 stitches until the earflap measures 3 inches.
Cut yarn, leaving a long tail, and set aside on an extra needle or stitch holder.
Make second earflap in the same manner.

On the same needle as the second earflap, cast on 24 stitches. Then pick up the stitches from the first earflap. Finally, cast on 14 more stitches. You now have 64 total stitches. 


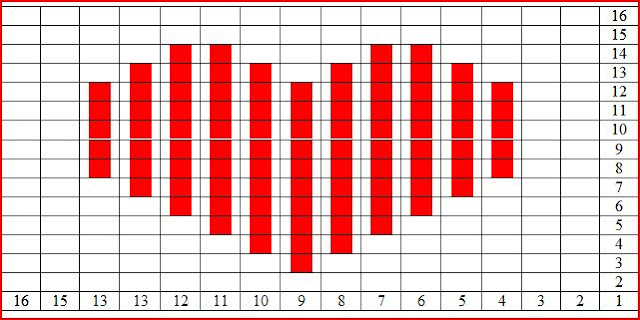
Join stitches in the round and work 1 inch in Stockinette stitch. Then work the pattern charted below for the hearts.  The pattern repeats 4 times around the hat. 


After completing the heart pattern, work in Stockinette stitch until the piece measures 6 inches from the bottom (not including the earflaps).

Decreasing:
If using circular needles, switch to double pointed needles when necessary (around row 5).
Row 1: *K4, K2tog to the last 4 stitches, K4 (54 sts)
Row 2: Knit
Row 3: *K3, K2tog to the last 4 stitches, K4 (44 sts)
Row 4: Knit
Row 5: *K2, K2tog to the end (33 sts)
Row 6: Knit
Row 7: *K1, K2tog to the end (22 sts)
Row 8: Knit
Row 9: *K2tog to the end (11 sts)
Row 10: Knit
Row 11: *K2tog to the last stitch, K1 (6 sts)

Finishing:
Cut the yarn and draw the remaining stitches together using a tapestry needle. Tie off.
Using the contrast color (red), work a row of single crochet (starting in the back) around the edge of the hat.

Ties:
Attach a piece of the contrast yarn to the middle of the earflap using a crochet hook.
Using two stitches, create an icord extending down about 7 inches. Make tassels for the ends of the icords and attach (for good directions on making tassels, go here). 

**Project may require steam blocking, as edges tend to curl. Here are some really good instructions for steam blocking acrylic things :)